效果: 原因:这是因为vue是单页面应用的原因,在前进或后退的时候使用这种方式将保持路径的正确性,#是vue的hash模式,这是一种默认的方式。此时router/index.js文件是这样的:import Vue from vueimport VueRoute...

效果:

原因:这是因为vue是单页面应用的原因,在前进或后退的时候使用这种方式将保持路径的正确性,#是vue的hash模式,这是一种默认的方式。此时router/index.js文件是这样的:
import Vue from 'vue'
import VueRouter from 'vue-router'
import Home from '../views/Home.vue'

Vue.use(VueRouter)

const routes = [
  {
    path: '/',
    name: 'home',
    component: Home
  },
  {
    path: '/about',
    name: 'about',
    component: () => import(/* webpackChunkName: "about" */ '../views/About.vue')
  }
]

const router = new VueRouter({
  routes
})

export default router
如果想去掉这个#,可以将hash模式改成history模式(默认为hash模式),即在index.js中加上mode: “history”,如下图:
import Vue from 'vue'
import VueRouter from 'vue-router'
import Home from '../views/Home.vue'

Vue.use(VueRouter)

const routes = [
  {
    path: '/',
    name: 'home',
    component: Home
  },
  {
    path: '/about',
    name: 'about',
    component: () => import(/* webpackChunkName: "about" */ '../views/About.vue')
  }
]

const router = new VueRouter({
  routes,
  mode: 'history'
})

export default router
效果如下:

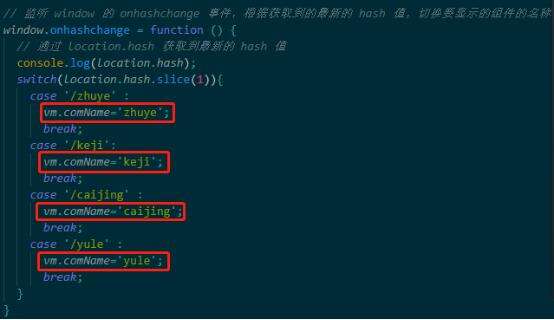
用Hash模式来实现简易路由:
首先定义四个a链接,每个a链接对应一个hash值.再定义一个component标签来展示对应的组件
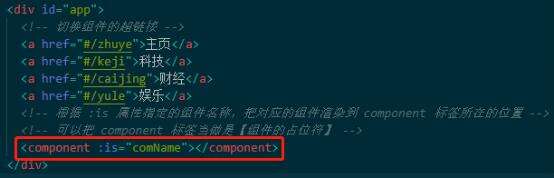

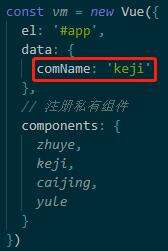
当点击每个a链接,改变地址栏中的url的hash值,当hash值变化,我们期望在主体区展示对应的组件。但是如何才能监听到hash值的变化呢?就要用到一个事件,叫window.onhashchange事件,通过hash值的变化就自动触发这个事件,在事件中就能通过location.hash拿到最新的hash值,然后做switchcase判断,从而决定在主体区域去渲染什么样的组件。
后端路由---->Ajax前端渲染---->SPA(前端路由)的演变过程:

在早期web开发中,绝大多数网站都采用后端路由的形式来渲染每一个网页,
后端路由指的是url请求地址与服务器资源之间的对应关系。后端路由的渲染方式是后端渲染,这样渲染方式是有性能问题的。后端渲染存在性能问题,假设用户与服务器之间经常要提交表单这样的数据交互行为,后端路由就会造成网页的频繁刷新,体验非常的差,因此就出现了Ajax技术,实现前端页面的局部刷新,很大程度上提高用户体验,但是单纯的Ajax技术并不支持浏览器的前进后退这些历史操作,也就是说浏览器没有办法保存用户在网页上的浏览状态的,因此前端又出现了SPA单页面程序开发技术,所谓的SPA指的是整个网站只有一个页面,内容的变化通过Ajax局部更新实现,同时SPA还支持浏览器地址栏的前进和后退操作。如何才能实现SPA呢?SPA最核心的技术是前端路由,前端路由的本质是用户事件与事件处理函数之间的对应关系。通过前端路由,可以提高用户的操作体验,同时也能让网页打开速度更快。
SPA的优缺点:
SPA的优点:1、用户操作体验好,用户不用刷新页面,整个交互过程都是通过Ajax来操作,故是客户端渲染。2、适合前后端分离开发;
SPA的缺点:1、首页加载慢,SPA会将js、CSS打包成一个文件,在加载页面显示的时候加载打包文件,如果打包文件较大或者网速慢则用户体验不好,所以门户不采用单页面应用。
2、SEO不友好,故门户、课程介绍不采用单页面应用,而管理系统采用单页面应用。
哈希路由(hash模式)和历史路由(history模式)源码解析:
随着前端应用的业务功能越来越复杂、用户对于使用体验的要求越来越高,单页应用(SPA)成为前端应用的主流形式。大型单页应用最显著特点之一就是采用前端路由系统,通过改变URL,在不重新请求页面的情况下,更新页面视图。“更新视图但不重新请求页面”是前端路由原理的核心之一,目前在浏览器环境中这一功能的实现主要有两种方式:
1、利用URL中的hash(“#”)
2、利用History interface在 HTML5中新增的方法
模式参数
在vue-router中是通过mode这一参数控制路由的实现模式的:
const router = new VueRouter({
  mode: 'history',
  routes: [...]
})
源码:
export default class VueRouter {

  mode: string; // 传入的字符串参数,指示history类别
  history: HashHistory | HTML5History | AbstractHistory; // 实际起作用的对象属性,必须是以上三个类的枚举
  fallback: boolean; // 如浏览器不支持,'history'模式需回滚为'hash'模式

  constructor (options: RouterOptions = {}) {

    let mode = options.mode || 'hash' // 默认为'hash'模式
    this.fallback = mode === 'history' && !supportsPushState // 通过supportsPushState判断浏览器是否支持'history'模式
    if (this.fallback) {
      mode = 'hash'
    }
    if (!inBrowser) {
      mode = 'abstract' // 不在浏览器环境下运行需强制为'abstract'模式
    }
    this.mode = mode

    // 根据mode确定history实际的类并实例化
    switch (mode) {
      case 'history':
        this.history = new HTML5History(this, options.base)
        break
      case 'hash':
        this.history = new HashHistory(this, options.base, this.fallback)
        break
      case 'abstract':
        this.history = new AbstractHistory(this, options.base)
        break
      default:
        if (process.env.NODE_ENV !== 'production') {
          assert(false, `invalid mode: ${mode}`)
        }
    }
  }

  init (app: any /* Vue component instance */) {

    const history = this.history

    // 根据history的类别执行相应的初始化操作和监听
    if (history instanceof HTML5History) {
      history.transitionTo(history.getCurrentLocation())
    } else if (history instanceof HashHistory) {
      const setupHashListener = () => {
        history.setupListeners()
      }
      history.transitionTo(
        history.getCurrentLocation(),
        setupHashListener,
        setupHashListener
      )
    }

    history.listen(route => {
      this.apps.forEach((app) => {
        app._route = route
      })
    })
  }

  // VueRouter类暴露的以下方法实际是调用具体history对象的方法
  push (location: RawLocation, onComplete?: Function, onAbort?: Function) {
    this.history.push(location, onComplete, onAbort)
  }

  replace (location: RawLocation, onComplete?: Function, onAbort?: Function) {
    this.history.replace(location, onComplete, onAbort)
  }
}
1、作为参数传入的字符串属性mode只是一个标记,用来指示实际起作用的对象属性history的实现类,两者对应关系如下:
'history':HTML5History
'hash':HashHistory
'abstract':AbstractHistory
2、在初始化对应的history之前,会对mode做一些校验:若浏览器不支持HTML5History方式(通过supportsPushState变量判断),则mode强制设为'hash';若不是在浏览器环境下运行,则mode强制设为'abstract'
在浏览器环境下的两种方式,分别就是在HTML5History,HashHistory两个类中实现的。
hash(“#”)符号的本来作用是加在URL中指示网页中的位置:
http://www.example.com/index.html#print
#符号后面的字符称之为hash。
export function getHash (): string {
  // 因为兼容性问题 这里没有直接使用 window.location.hash
  // 因为 Firefox decode hash 值
  const href = window.location.href
  const index = href.indexOf('#')
  // 如果此时没有 # 则返回 ''
  // 否则 取得 # 后的所有内容
  return index === -1 ? '' : href.slice(index + 1)
}
hash值以斜杠(slash)开头:
// 保证 hash 以 / 开头
function ensureSlash (): boolean {
  // 得到 hash 值
  const path = getHash()
  // 如果说是以 / 开头的 直接返回即可
  if (path.charAt(0) === '/') {
    return true
  }
  // 不是的话 需要手工保证一次 替换 hash 值
  replaceHash('/' + path)
  return false
}
获取不带base的location。
// 得到 不带 base 值的 location
export function getLocation (base: string): string {
  let path = window.location.pathname
  if (base && path.indexOf(base) === 0) {
    path = path.slice(base.length)
  }
  // 是包含 search 和 hash 的
  return (path || '/') + window.location.search + window.location.hash
}
在不带base的location前添加/#,
如果设置的是 history 但是如果浏览器不支持的话 ,强制退回到 hash。如果说此时的地址不是以 /# 开头的,需要做一次降级处理 降级为 hash 模式下应有的 /# 开头
 checkFallback () {
    // 得到除去 base 的真正的 location 值
    const location = getLocation(this.base)
    if (!/^\/#/.test(location)) {
      // 如果说此时的地址不是以 /# 开头的
      // 需要做一次降级处理 降级为 hash 模式下应有的 /# 开头
      window.location.replace(
        cleanPath(this.base + '/#' + location)
      )
      return true
    }
  }
HashHistory
继承History基类:
// 继承 History 基类
export class HashHistory extends History {
  constructor (router: VueRouter, base: ?string, fallback: boolean) {
    // 调用基类构造器
    super(router, base)

    // 如果说是从 history 模式降级来的
    // 需要做降级检查
    if (fallback && this.checkFallback()) {
      // 如果降级 且 做了降级处理 则什么也不需要做
      return
    }
    // 保证 hash 是以 / 开头
    ensureSlash()
  }
可以看到在实例化过程中主要做两件事情:针对于不支持 history api 的降级处理,以及保证默认进入的时候对应的 hash 值是以 / 开头的,如果不是则替换。
友善高级的 HTML5History
HTML5History 则是利用 history.pushState/repaceState API 来完成 URL 跳转而无须重新加载页面,页面地址和正常地址无异;
// ...
import { cleanPath } from '../util/path'
import { History } from './base'
// 记录滚动位置工具函数
import {
  saveScrollPosition,
  getScrollPosition,
  isValidPosition,
  normalizePosition,
  getElementPosition
} from '../util/scroll-position'

// 生成唯一 key 作为位置相关缓存 key
const genKey = () => String(Date.now())
let _key: string = genKey()

export class HTML5History extends History {
  constructor (router: VueRouter, base: ?string) {
    // 基类构造函数
    super(router, base)

    // 定义滚动行为 option
    const expectScroll = router.options.scrollBehavior
    // 监听 popstate 事件 也就是
    // 浏览器历史记录发生改变的时候(点击浏览器前进后退 或者调用 history api )
    window.addEventListener('popstate', e => {
// ...
    })

    if (expectScroll) {
      // 需要记录滚动行为 监听滚动事件 记录位置
      window.addEventListener('scroll', () => {
        saveScrollPosition(_key)
      })
    }
  }
// ...
}
// ...
可以看到在这种模式下,初始化作的工作相比 hash 模式少了很多,只是调用基类构造函数以及初始化监听事件,不需要再做额外的工作。
history 改变
history 改变可以有两种,一种是用户点击链接元素,一种是更新浏览器本身的前进后退导航来更新。
第一种方式:更新浏览器本身的前进后退导航
先来说浏览器导航发生变化的时候会触发对应的事件:对于 hash 模式而言触发 window 的 hashchange 事件,对于 history 模式而言则触发 window 的 popstate 事件。
hash模式
 onHashChange () {
    // 不是 / 开头
    if (!ensureSlash()) {
      return
    }
    // 调用 transitionTo
    this.transitionTo(getHash(), route => {
      // 替换 hash
      replaceHash(route.fullPath)
    })
  }
replaceHash()方法直接调用 replace 强制替换 以避免产生“多余”的历史记录,其实就是更新浏览器的 hash 值,push 和 replace 的场景下都是一个效果。
function replaceHash (path) {
  const i = window.location.href.indexOf('#')
  // 直接调用 replace 强制替换 以避免产生“多余”的历史记录
  // 主要是用户初次跳入 且hash值不是以 / 开头的时候直接替换
  // 其余时候和push没啥区别 浏览器总是记录hash记录
  window.location.replace(
    window.location.href.slice(0, i >= 0 ? i : 0) + '#' + path
  )
}
transitionTo 方法的功能是路由跳转,它接收三个参数:1. location:要转向的路由地址。2. onComplete:完成后的回调。3. onAbort:取消时的回调
// 确认过渡
  confirmTransition (route: Route, cb: Function) {
    const current = this.current  // 当前路由
    // 如果是相同 直接返回
    if (isSameRoute(route, current)) {  // 如果目标路由route与当前路由相同,取消跳转
      this.ensureURL()
      return
    }
    const {
      deactivated,
      activated
    } = resolveQueue(this.current.matched, route.matched)

    // 整个切换周期的队列
    const queue: Array<?NavigationGuard> = [].concat(
      // leave 的钩子
      extractLeaveGuards(deactivated),
      // 全局 router before hooks
      this.router.beforeHooks,
      // 将要更新的路由的 beforeEnter 钩子
      activated.map(m => m.beforeEnter),
      // 异步组件
      resolveAsyncComponents(activated)
    )

    this.pending = route
    // 每一个队列执行的 iterator 函数
    const iterator = (hook: NavigationGuard, next) => {
// ...
    }
    // 执行队列 leave 和 beforeEnter 相关钩子
    runQueue(queue, iterator, () => {
//...
    })
  }
history模式
window.addEventListener('popstate', e => {
  // 取得 state 中保存的 key
  _key = e.state && e.state.key
  // 保存当前的先
  const current = this.current
  // 调用 transitionTo
  this.transitionTo(getLocation(this.base), next => {
    if (expectScroll) {
      // 处理滚动
      this.handleScroll(next, current, true)
    }
  })
})
第二种方式:点击链接交互
即点击了 <router-link>,回顾下这个组件在渲染的时候做的事情:
// ...
  render (h: Function) {
// ...

    // 事件绑定
    const on = {
      click: (e) => {
        // 忽略带有功能键的点击
        if (e.metaKey || e.ctrlKey || e.shiftKey) return
        // 已阻止的返回
        if (e.defaultPrevented) return
        // 右击
        if (e.button !== 0) return
        // `target="_blank"` 忽略
        const target = e.target.getAttribute('target')
        if (/\b_blank\b/i.test(target)) return
        // 阻止默认行为 防止跳转
        e.preventDefault()
        if (this.replace) {
          // replace 逻辑
          router.replace(to)
        } else {
          // push 逻辑
          router.push(to)
        }
      }
    }
    // 创建元素需要附加的数据们
    const data: any = {
      class: classes
    }

    if (this.tag === 'a') {
      data.on = on
      data.attrs = { href }
    } else {
      // 找到第一个 <a> 给予这个元素事件绑定和href属性
      const a = findAnchor(this.$slots.default)
      if (a) {
        // in case the <a> is a static node
        a.isStatic = false
        const extend = _Vue.util.extend
        const aData = a.data = extend({}, a.data)
        aData.on = on
        const aAttrs = a.data.attrs = extend({}, a.data.attrs)
        aAttrs.href = href
      } else {
        // 没有 <a> 的话就给当前元素自身绑定时间
        data.on = on
      }
    }
    // 创建元素
    return h(this.tag, data, this.$slots.default)
  }
// ...
这里一个关键就是绑定了元素的 click 事件,当用户触发后,会调用 router 的 push 或 replace 方法来更新路由。下边就来看看这两个方法定义,
 push (location: RawLocation) {
    this.history.push(location)
  }

  replace (location: RawLocation) {
    this.history.replace(location)
  }
HashHistory
// ...
  push (location: RawLocation) {
    // 调用 transitionTo
    this.transitionTo(location, route => {
// ...
    })
  }

  replace (location: RawLocation) {
    // 调用 transitionTo
    this.transitionTo(location, route => {
// ...
    })
  }
// ...
操作是类似的,主要就是调用基类的 transitionTo 方法来过渡这次历史的变化,在完成后更新当前浏览器的 hash 值。
HashHistory的push方法:
将新路由添加到浏览器访问历史的栈顶

 push (location: RawLocation) {
    // 调用 transitionTo
    this.transitionTo(location, route => {
      // 完成后 pushHash
      pushHash(route.fullPath)
    })
  }
function pushHash (path) {
  window.location.hash = path
}
HashHistory的replace方法:
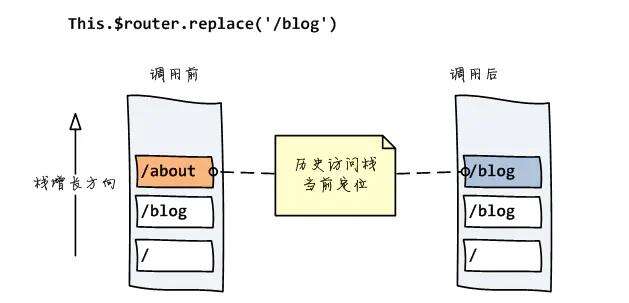
replace()方法与push()方法不同之处在于,它并不是将新路由添加到浏览器访问历史的栈顶,而是替换掉当前的路由
replace (location: RawLocation, onComplete?: Function, onAbort?: Function) {
  this.transitionTo(location, route => {
    replaceHash(route.fullPath)
    onComplete && onComplete(route)
  }, onAbort)
}

function replaceHash (path) {
  const i = window.location.href.indexOf('#')
  window.location.replace(
    window.location.href.slice(0, i >= 0 ? i : 0) + '#' + path
  )
}
location的replace()方法可用一个新页面取代当前页面。
其实就是更新浏览器的 hash 值,push 和 replace 的场景下都是一个效果。
transitionTo (location: RawLocation, cb?: Function) {
    // 调用 match 得到匹配的 route 对象
    const route = this.router.match(location, this.current)
    // 确认过渡
    this.confirmTransition(route, () => {
      // 更新当前 route 对象
      this.updateRoute(route)
      cb && cb(route)
      // 子类实现的更新url地址
      // 对于 hash 模式的话 就是更新 hash 的值
      // 对于 history 模式的话 就是利用 pushstate / replacestate 来更新
      // 浏览器地址
      this.ensureURL()
    })
  }
  // 确认过渡
  confirmTransition (route: Route, cb: Function) {
    const current = this.current
    // 如果是相同 直接返回
    if (isSameRoute(route, current)) {
      this.ensureURL()
      return
    }
    const {
      deactivated,
      activated
    } = resolveQueue(this.current.matched, route.matched)

    // 整个切换周期的队列
    const queue: Array<?NavigationGuard> = [].concat(
      // leave 的钩子
      extractLeaveGuards(deactivated),
      // 全局 router before hooks
      this.router.beforeHooks,
      // 将要更新的路由的 beforeEnter 钩子
      activated.map(m => m.beforeEnter),
      // 异步组件
      resolveAsyncComponents(activated)
    )

    this.pending = route
    // 每一个队列执行的 iterator 函数
    const iterator = (hook: NavigationGuard, next) => {
// ...
    }
    // 执行队列 leave 和 beforeEnter 相关钩子
    runQueue(queue, iterator, () => {
//...
    })
  }
回到 confirmTransition 的回调,最后还做了一件事情 ensureURL:
ensureURL (push?: boolean) {
  const current = this.current.fullPath
  if (getHash() !== current) {
    push ? pushHash(current) : replaceHash(current)
  }
}
此时 push 为 undefined,所以调用 replaceHash 更新浏览器 hash 值。
本文标题为:vue项目地址上的#是哪来的?(前端路由的hash模式和history模式)


- javascript 判断当前浏览器版本并判断ie版本 2023-08-08
- ajax实现输入提示效果 2023-02-14
- 1 Vue - 简介 2023-10-08
- 深入浅析AjaxFileUpload实现单个文件的 Ajax 文件上传库 2022-12-15
- 基于CORS实现WebApi Ajax 跨域请求解决方法 2023-02-14
- JS实现左侧菜单工具栏 2022-08-31
- layui数据表格以及传数据方式 2022-12-13
- jsPlumb+vue创建字段映射关系 2023-10-08
- 关于 html:如何从 css 表中删除边距和填充 2022-09-21
- vue keep-alive 2023-10-08